Your guide to a high performance I2P Router.
You're just 10 minutes away from setting up a high performance I2P Network router.
We’re happy to proudly support and promote the I2P Network. While it’s likely most users run their I2P router service at home, it’s more beneficial to the network to run a router that has a great internet connection and is always available, 24/7. The following guide will show you how to install a high performance I2P router and how to connect to it from home.

I2P+ Router Installation
First thing’s first, you need to SSH into your fresh installation of Debian or Ubuntu. Of course, I2P+ will work on other distributions but we are using Debian 10 for our OS for this new I2P+ router install.
ssh user@i2p-routerLet’s go ahead and fetch all prerequesites. In the examples below, I use the user fin-router. If you have not already created a new user on your server for I2P+ to be installed under, do that now.
sudo apt install default-jdk wgetInstalling default-jdk will result in a lot of other required packages being grabbed as well, about 700Mb worth on a Debian 10 minimal OS.
Now that you’re logged in and have the pre-requesites, go ahead and fetch I2P+.
NOTE: At the time of writing this, 0.9.50 was the latest release so our URLs in the examples reflect that. To check for the latest releases, view The Latest I2P+ Releases and amend the instructions as needed below.
sudo wget https://i2pplus.github.io/installers/i2pinstall_0.9.50-0+_linux-only.jarOnce downloaded, we can run the headless java installer for a quick, guided setup within the terminal:
java -jar i2pinstall_0.9.50-0+_linux-only.jar -consoleYou will then be met with a couple of prompts for input to complete your install and setup.
For: “Select Target Path”, it will default to /home/user/ (In our case, /home/fin-i2p). Let's install it to /home/user/i2p instead to help keep things tidy on the server. You should install to /home/username/i2p/ as the default will install to the user's home directory. (Note: Don’t install I2P+ as root!)
Your terminal should look like this:
fin-i2p@routerguide:~$ java -jar i2pinstall_0.9.50-0+_linux-only.jar -console
        Welcome to the installation of i2p 0.9.50+!
        press 1 to continue, 2 to quit, 3 to redisplay
        1
        Select target path [/home/fin-i2p]
        /home/fin-i2p/i2p

        press 1 to continue, 2 to quit, 3 to redisplay
        1
        [ Starting to unpack ]
        [ Processing package: Base (1/1) ]
        [ Unpacking finished ]
        [ Console installation done ]
Let’s make sure that I2P+ will start automatically if we restart our VPS. The next two commands are optional but we recommend them.
nano /etc/rc.localThen add to end of the file: (make sure you change ‘yourusername’ to your actual user name and change the path of your I2P+ install if different than the default.
/bin/su yourusername -c "/home/yourusername/i2p/i2prouter start"Great, now if you reboot your VPS I2P+ will come back online automatically!
Now let’s launch I2P+ from the terminal and finish setup via the browser. From your SSH user's home directory, run the following.
~/i2p/i2prouter startYou should see the following output, if so, the I2P service has started without error.
fin-i2p@routerguide:~$ ~/i2p/i2prouter start
Starting I2P Service...
Waiting for I2P Service.....
running: PID:19929
Tunneling localhost traffic to your remote I2P+ router
To connect to our new remote I2P+ router from our local desktop we must first forward some local ports over the internet to our new router. This next step will be required anytime you want to connect to your remote router from your desktop, even if your remote router is running 24/7.
Open a new terminal or terminal tab and run the following from your local desktop, changing your SSH port, SSH user (same as I2P+ user) and server IP/hostname. Do NOT change any 127.0.0.1 IP, as this is telling your desktop to route localhost requests for these specific I2P ports to be sent to your new I2P+ router that is defined at the end of the command.
ssh -fTNL 4444:127.0.0.1:4444 -L 7657:127.0.0.1:7657 -L 7667:127.0.0.1:7667 -L 7658:127.0.0.1:7658
 -L 6668:127.0.0.1:6668 -L 7656:127.0.0.1:7656 fin-i2p@YourVPS -p 1234
Once connected, go to your web-browser and and go to: https://localhost:7667/
Please note that the router console uses a self-signed certificate, so you’ll likely need to manually accept it. You can also connect to http://localhost:7657/ as a non-SSL option.
You should now see your I2P+ router console. But before you start clicking around, let’s finish the basic setup so that you can get the most out of your new I2P+ router.
You'll want to run the "New Install Wizard" by going to https://127.0.0.1:7667/wizard before you dive into I2P. This next step takes only a couple of minutes and will adjust some settings to help optimize your new router. In a later guide we'll talk about how to really tune your configuration to accept a high amount of tunnels and peers to push heavy traffic for the network.
 The Configuration Wizard's Bandwidth Test
After the wizard has completed the setup, you will want to update your Address Book's Subscription List. These subscription lists allow you to access user-friendly URLs (like ours, webhosting.i2p) instead of the randomly generated B32 address (like hxqjbkpn5fxnmurlab6oluyqf3dd2xnxszeawn4ak2s4rpjnfheq.b32.i2p.) Various sites maintain addressbook subscription lists (aka host lists) which when added to your addressbook make browsing the network much less of an ordeal. The below lists cover most things.
Head to: https://localhost:7667/dns and click on the, "Subscriptions" tab as we're going to make a couple of changes. I usually remove the default lists and replace with the following:
http://notbob.i2p/hosts.txt
http://skank.i2p/hosts.txt
http://stats.i2p/cgi-bin/newhosts.txt
http://identiguy.i2p/hosts.txt
NOTE: You may also wish to substitute http://notbob.i2p/hosts.txt with http://notbob.i2p/hosts-all.txt for access to additional sites note listed above. Be warned that this list contains some offensive content. This list contains all of the original entries in the original file, but without the removal of offensive or obscene websites.
Setting up your browser to access I2P network sites
The I2P network has "Eepsites", websites that are accessible from the I2P network using a .b32.i2p or .i2p address. This is somewhat similar to how the Tor Network has "Onion Services".
To access these eepsites your browser must first be configured to proxy your requests over the I2P network. Regular websites, by default, will use the purokishi.i2p outproxy.
This outproxy will allow you to browse the regular internet in a similar fashion to using a Tor Exit. Your network requests will be routed through the I2P network of routers, similar to what you have just installed, and will use the defined outproxy to fetch the data from the regular internet.
Purokishi is the default outproxy for I2P+ and consists of multiple exit points to distribute traffic and increase anonymity. You will also be able to access .i2p websites with this configuration as well, which opens access to an open and uncensorable web.
In Firefox (or the browser of your choice) change your network proxy settings to what is shown below. For this to work, you must have first completed the earlier step where you create a SSH tunnel for your I2P localhost ports.
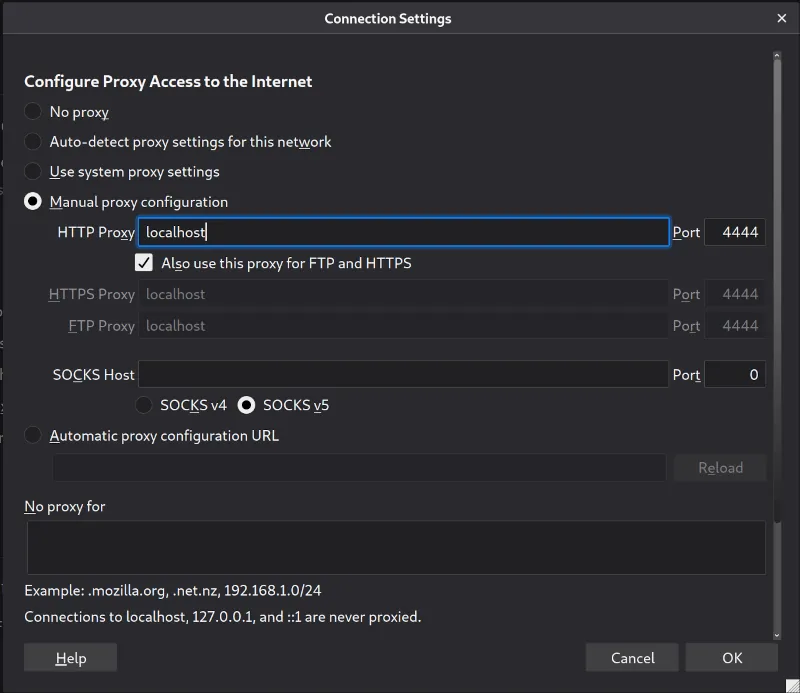 Firefox's Proxy Configuration
Test It Out
At this point you should be ready to browse the I2P network. Things may be a tad slow in the beginning, as your router warms up and is discovered by others on the network, however at this point you're ready to begin browsing!
Some websites of interest:
- NotBob.i2p - A list of active network websites and uptime monitor. A great place to find some other sites to check out.
- Skank.i2p - The project website of I2P+ (Note: Skanking is a form of dancing practiced in the ska, ska punk, hardcore punk, reggae, jump-up and other music scenes. The site is 'Safe For Work' despite the name.)
- I2PForum.i2p - A great place to discuss all things related to the I2P network and the software used to connect to it.
You will also find a great list of websites available from your router console's homepage with a list of, "Sites Of Interest" shown.
For the latest releases and updates for all things I2P+, please visit https://i2pplus.github.io/ or join the #saltr IRC channel on Irc2P.
| Hosted On: | Social / Chat: | ||||||
© 2020 - 2026 IncogNET LLC – A Internet Speech & Privacy Company Brand – All Rights Reserved |